Install OsiriX as a PACS server
What is PACS server?
A PACS (Picture Archiving and Communication System) server is a computer for the short- and long-term storage, retrieval, management, distribution and presentation of medical images. Medical equipment can automatically store the medical images on the PACS server. Other computers, equipped with OsiriX, can store and retrieve images directly from the PACS server.
You can use OsiriX as a PACS server with these benefits:
- Based on OsiriX DICOM engine and Database (SQLite) engine
- Unlimited number of simultaneous clients
- Manage your PACS through OsiriX GUI
- Fully compatible with Mac hardware and software
- Fully compatible with DICOM protocol (C-Move, C-Store, C-Find, C-Get, WADO, WADO-RS)
- Seamless integration with any DICOM viewers, through the DICOM protocol
- Web access through built-in web server, built-in HTML5 viewer compatible with any OS
- Expansion: write your own plugins to extend the integration with any protocols/systems, including EMR, RIS or HIS.
Introduction
Typically a PACS network consists of a central PACS server which stores a database containing the images, and of multiple clients that can retrieve and display these images on medical imaging software. The images are stored in DICOM format. The modalities (MRI, CT, PET, Ultrasounds, …) send the images to the PACS Server by using a DICOM “push” (DICOM C-Store). The server and the clients communicates by using the DICOM protocol (DICOM C-Store, WADO or Query & Retrieve). The clients display the images by using a medical imaging software: a DICOM viewer.
Each computer in a DICOM network are identified by their network address (IP address), a communication port (TCP/IP port) and a name (AETitle): each computer is a DICOM Node in the DICOM network. IP address, TCP/IP port number and AETitle is the information required to connect each DICOM Node to the DICOM network. These informations can be found in the Preferences > Listener window in OsiriX.
Hence, to build a PACS, you need:
- A PACS Server: a computer with a lot of hard disk space and a PACS Server software. The PACS Server software needs to be robust, working flawlessly 24/7, with a powerful database engine, capable of storing millions of DICOM images.
- PACS Clients: computers with a DICOM viewer software, like OsiriX. These PACS Clients can query and retrieve the DICOM images from the PACS server, by using the DICOM network protocol (DICOM C-Move, C-Store, C-Get, C-Find, WADO, WADO-RS, …).
The important qualities of a DICOM viewer are:
- Fast transferring time (only limited by the network bandwidth)
- Fast loading time to be able to load and browse 1’000 images in less than few seconds
- Complete DICOM protocol supports to handle all different types of DICOM images
- Powerfull 2D imaging functions to analyze the images (ROIs, window levels, zooming, ….)
- 3D post-processing functions to view the datasets in volume rendering, MPR or MIP
- Image fusion support to multi-modal modalities like PET-CT, PET-MR, SPECT-CT studies
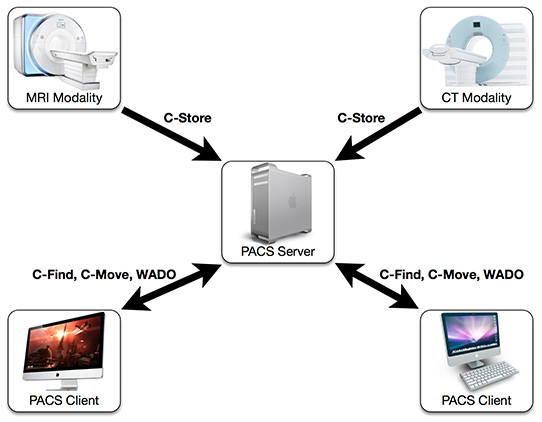
PACS Network architecture (Q&R = DICOM Query & Retrieve protocol):
Multiple Modalities, a PACS Server, and multiple PACS Clients (PACS Workstations / DICOM Viewers)
To build our PACS network, we will use OsiriX (always use the last available version!), as the DICOM viewer, and as the PACS server.
Set-up
Hardware
- For the PACS Server: choose a MacPro with 4TB of storage to store up to 25 millions of CT images. We highly recommend a RAID system: for example, you can install 4 identical hard disks in the MacPro, and format them as a RAID 5 system. You’ll have faster performances, and a more secure system (no data are lost if a drive fails). You can also use an external RAID system, connected through FireWire or Thunderbolt for best performances (Promise VTrak, Promise Pegasus, LaCie RAID towers).
- For the PACS Clients: choose iMac or MacPro, depending if you need to do 3D post-processing or only 2D viewing. If needed, connect a Medical monitors (Totoku, Eizo, …). A SSD is highly recommended for best performances when loading the images. Select at least 8GB of RAM.
- Build your network on a 1GB or faster Ethernet hardware. Select high performances active routers.
Software
- For the PACS Server: we will use OsiriX MD with specific settings.
- For the PACS Clients: we use OsiriX MD.
Set-up of OsiriX as a PACS server
Use OsiriX MD for best performances, and unlimited performances.
We want to be sure that your PACS server will be also running:
- In macOS preferences, activate automatic restart after a power failure (Energy Server, Power tab, “Start up automatically after a power failure”)
- In macOS preferences, select automatic log-in (Users & Groups, Login Options, Automatic login)
- We want to be sure OsiriX is always running (after a computer restart or crash). We will create a LaunchAgent file. You can uses Lingon to easily create an always-up setting (select At Login and Keep running).
- We want to be sure OsiriX is always responsive (Spinning Beach Ball of Death). We will install a small software running as a different process: it will test if OsiriX is alive and responsive. It uses the built-in Web server and the XML-RPC interfaces of OsiriX to send tests to the database: hence be sure to activate them in OsiriX preferences. If OsiriX doesn’t answer to the requests, this software will kill OsiriX, allowing it to restart (thanks to the LaunchAgent settings). For the Web server address, use “http(s)://localhost:XXXX/testdbalive”, and for the XML-RPC interface, use “http(s):localhost:XXXX”. This software is available here. (Be sure that this software is always running by creating a LaunchAgent for it – see previous paragraph).
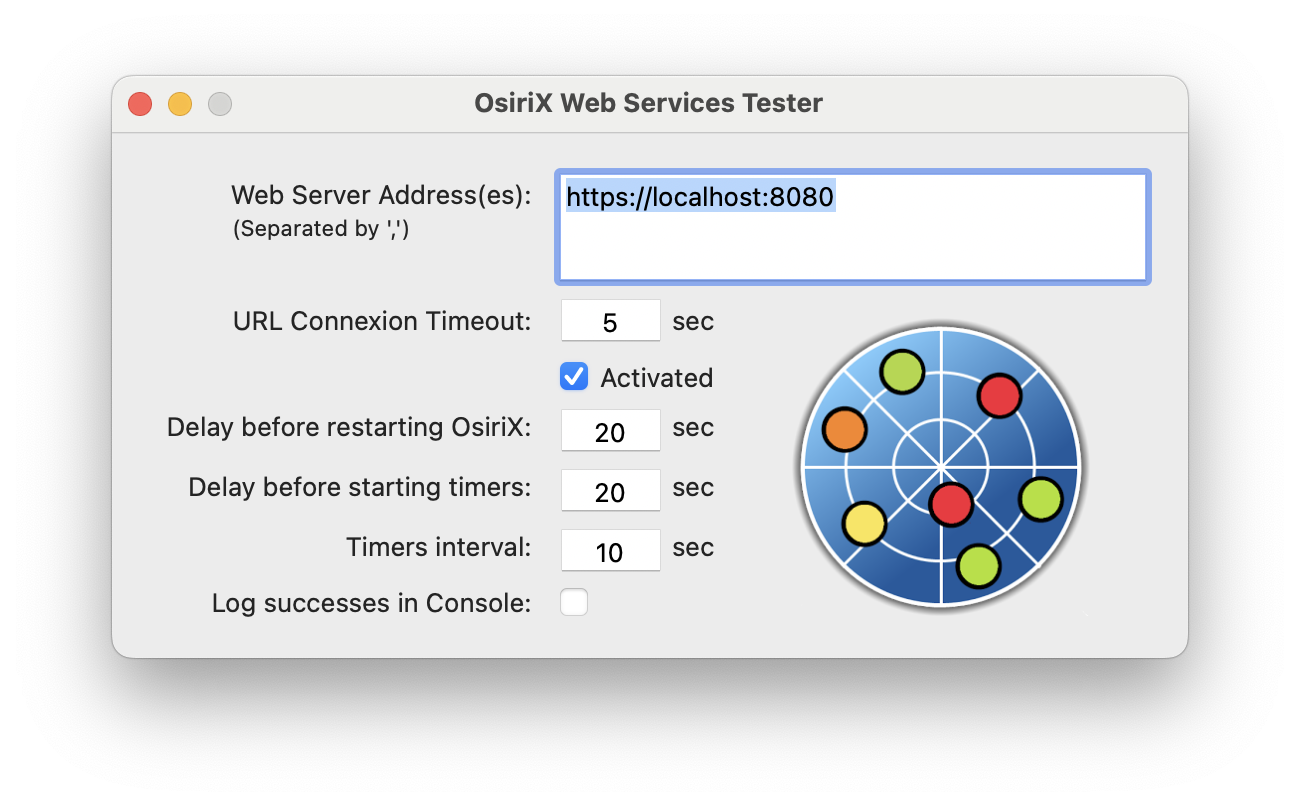
- Activate the DICOM “SCP modes” (SCP: Service Class Provider) in OsiriX. These modes allow OsiriX to function as a server. OsiriX will accept external connections from other DICOM viewers. Go to OsiriX Preferences > Listener.
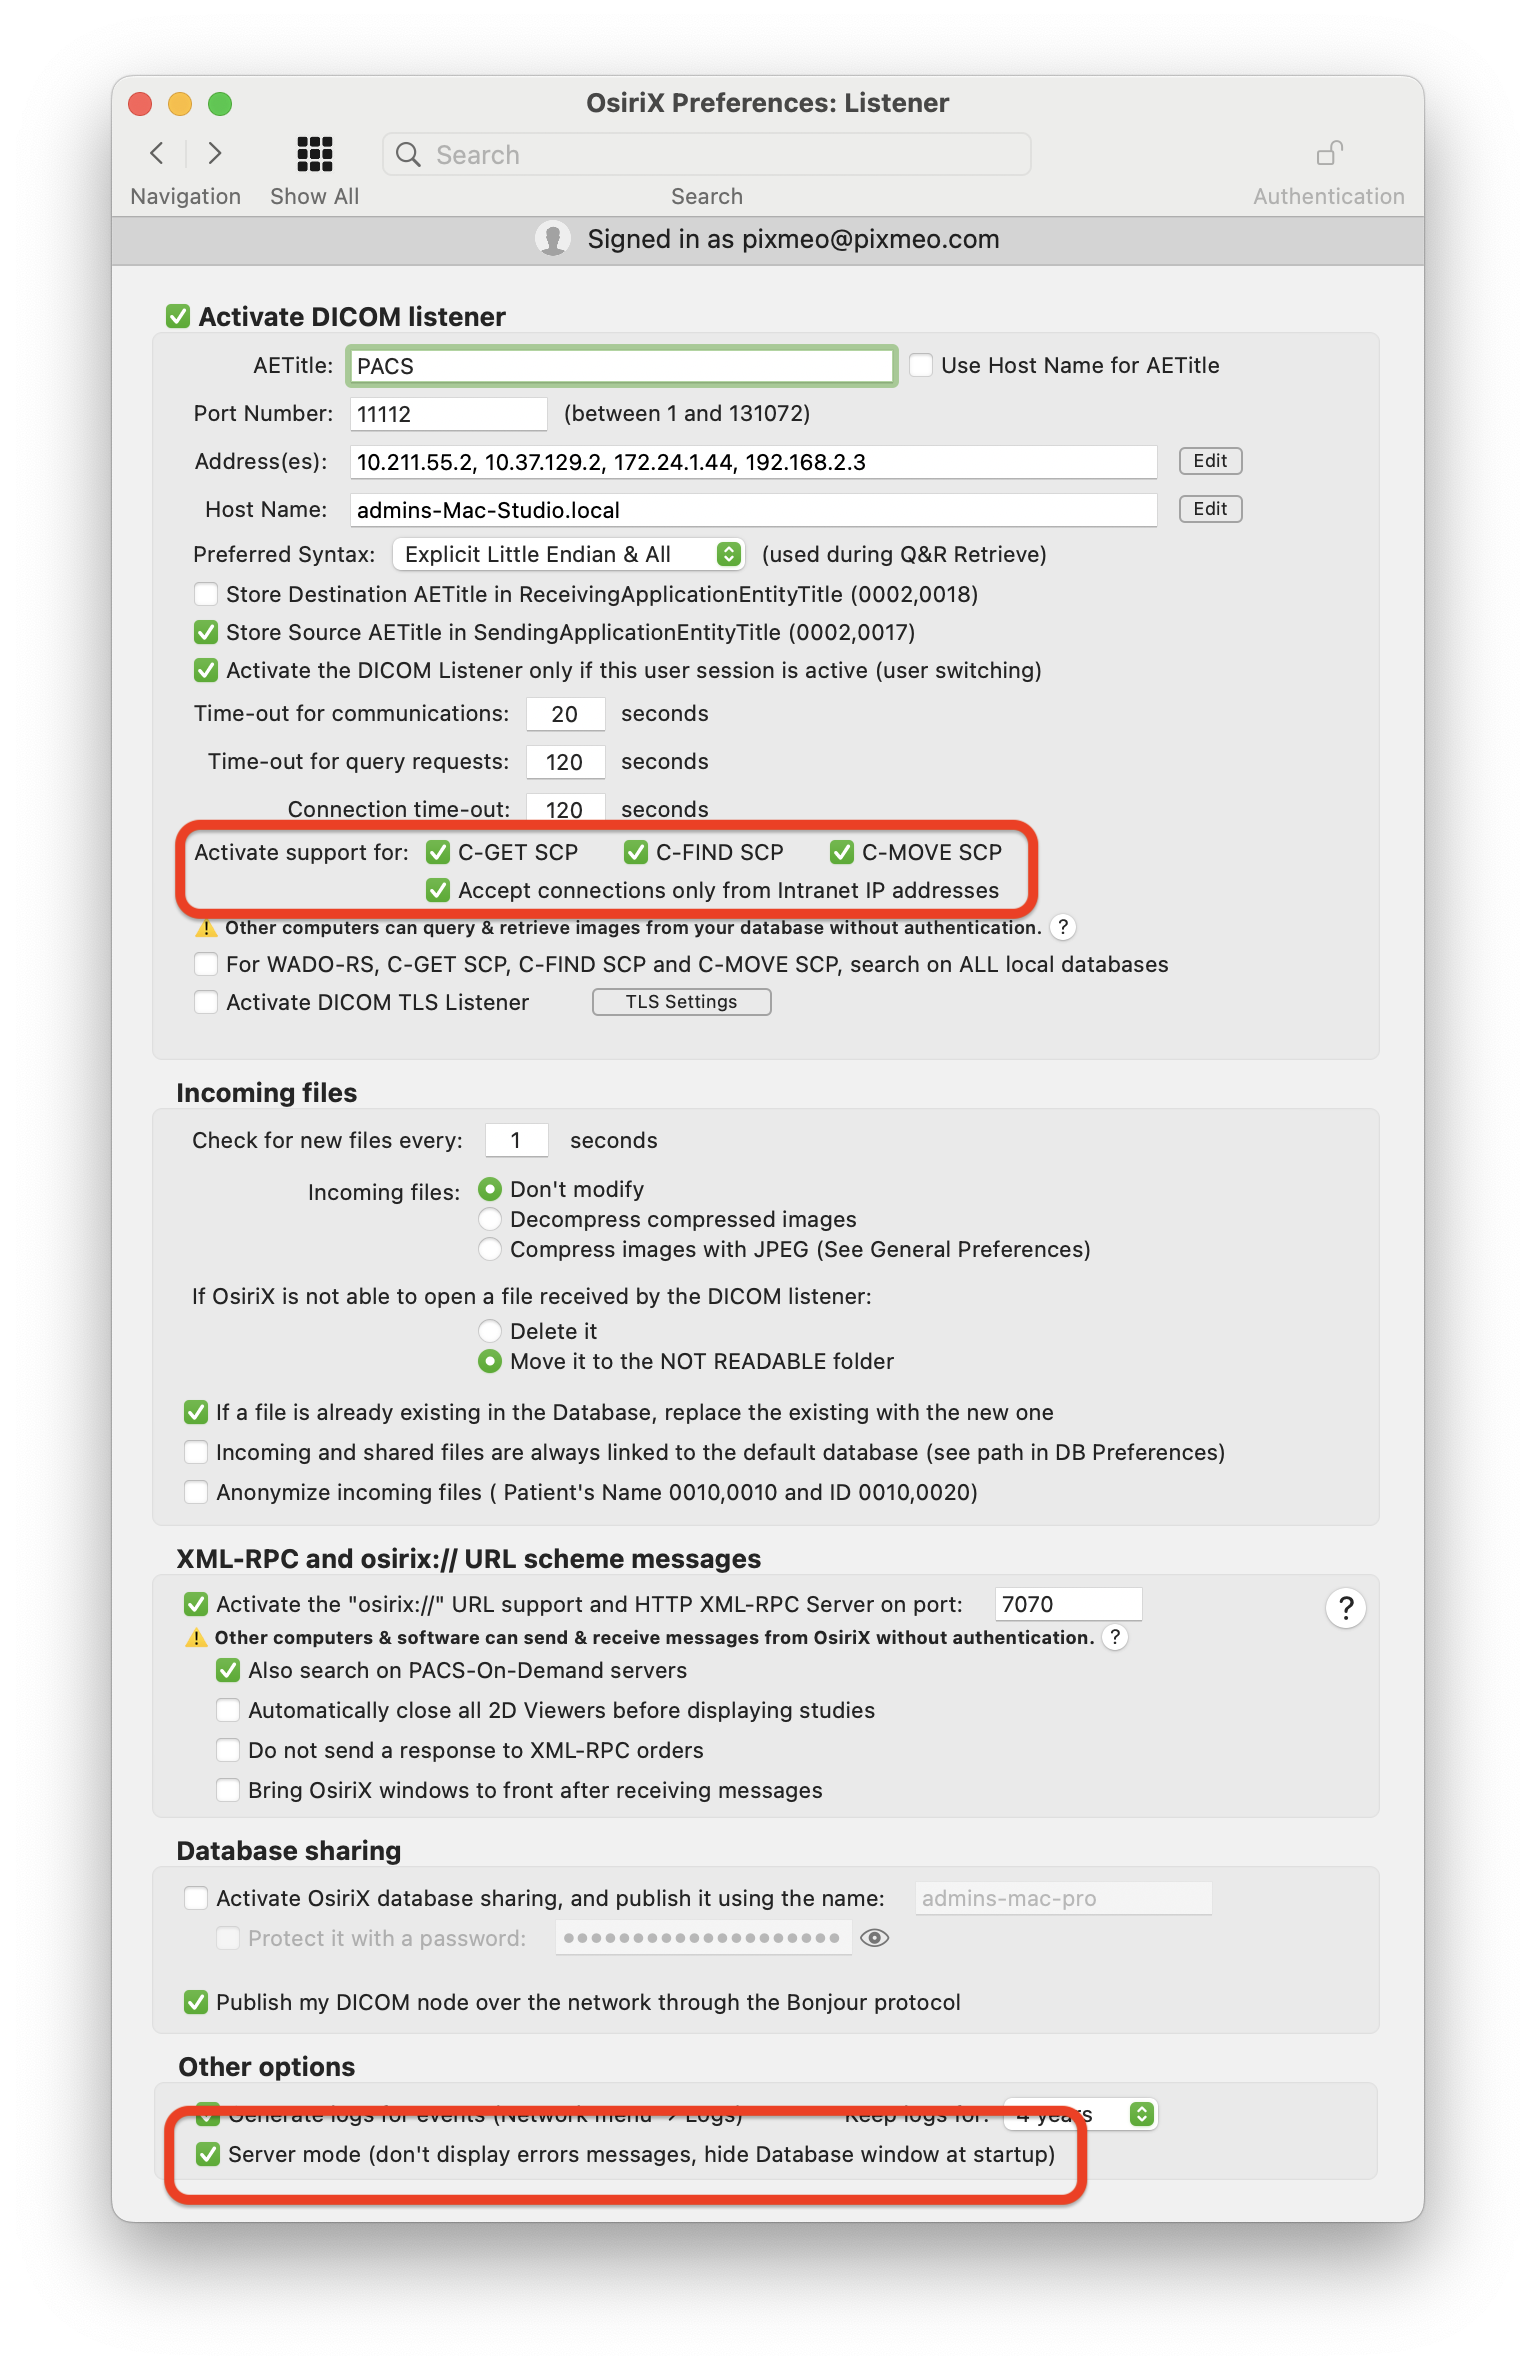
- Activate the “Server mode” in OsiriX. This mode will hide the GUI, and OsiriX will never present a blocking window to the user (nobody will look at the server monitor to click the “OK” button…). Go to OsiriX Preferences > Listener, Server mode.
- If you want to support WADO and WADO-RS, activate the WebPortal in Preferences > Web Portal window.
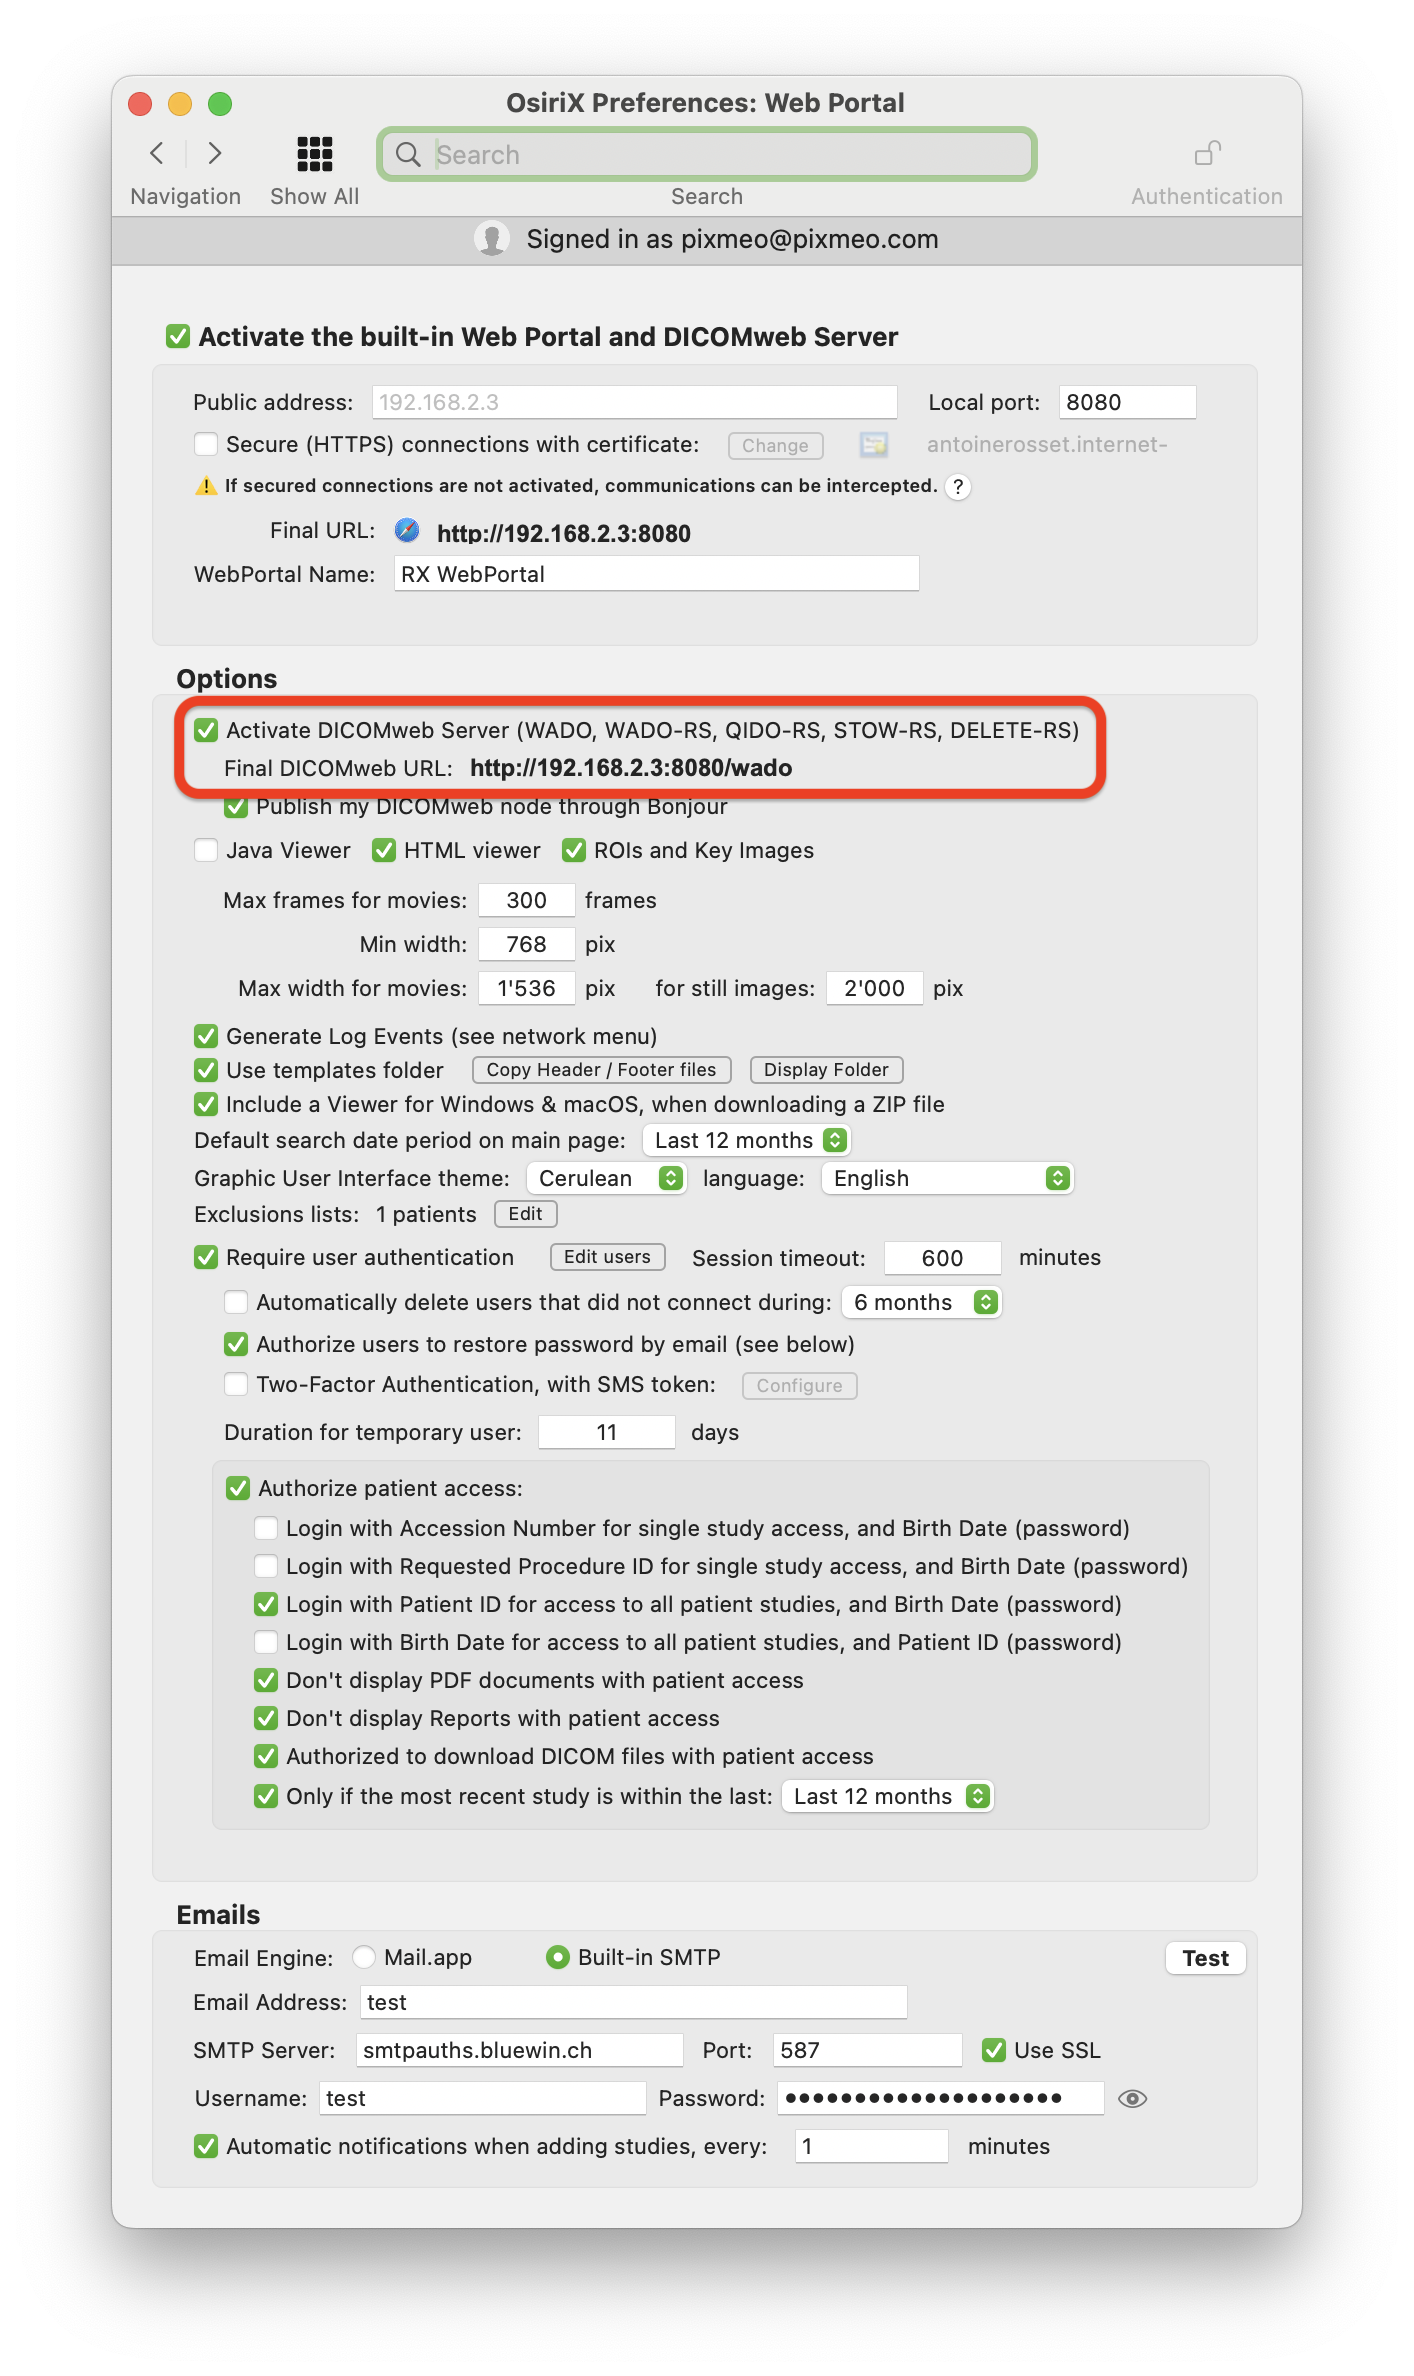
Set-up OsiriX as a PACS Client (DICOM Viewer)
To be able to Send or Retrieve an exam from/to your new PACS Server, you need to declare it on each PACS Clients:
Run OsiriX, select Preferences > Locations and add your DICOM PACS Server informations (upper table) in your OsiriX client:
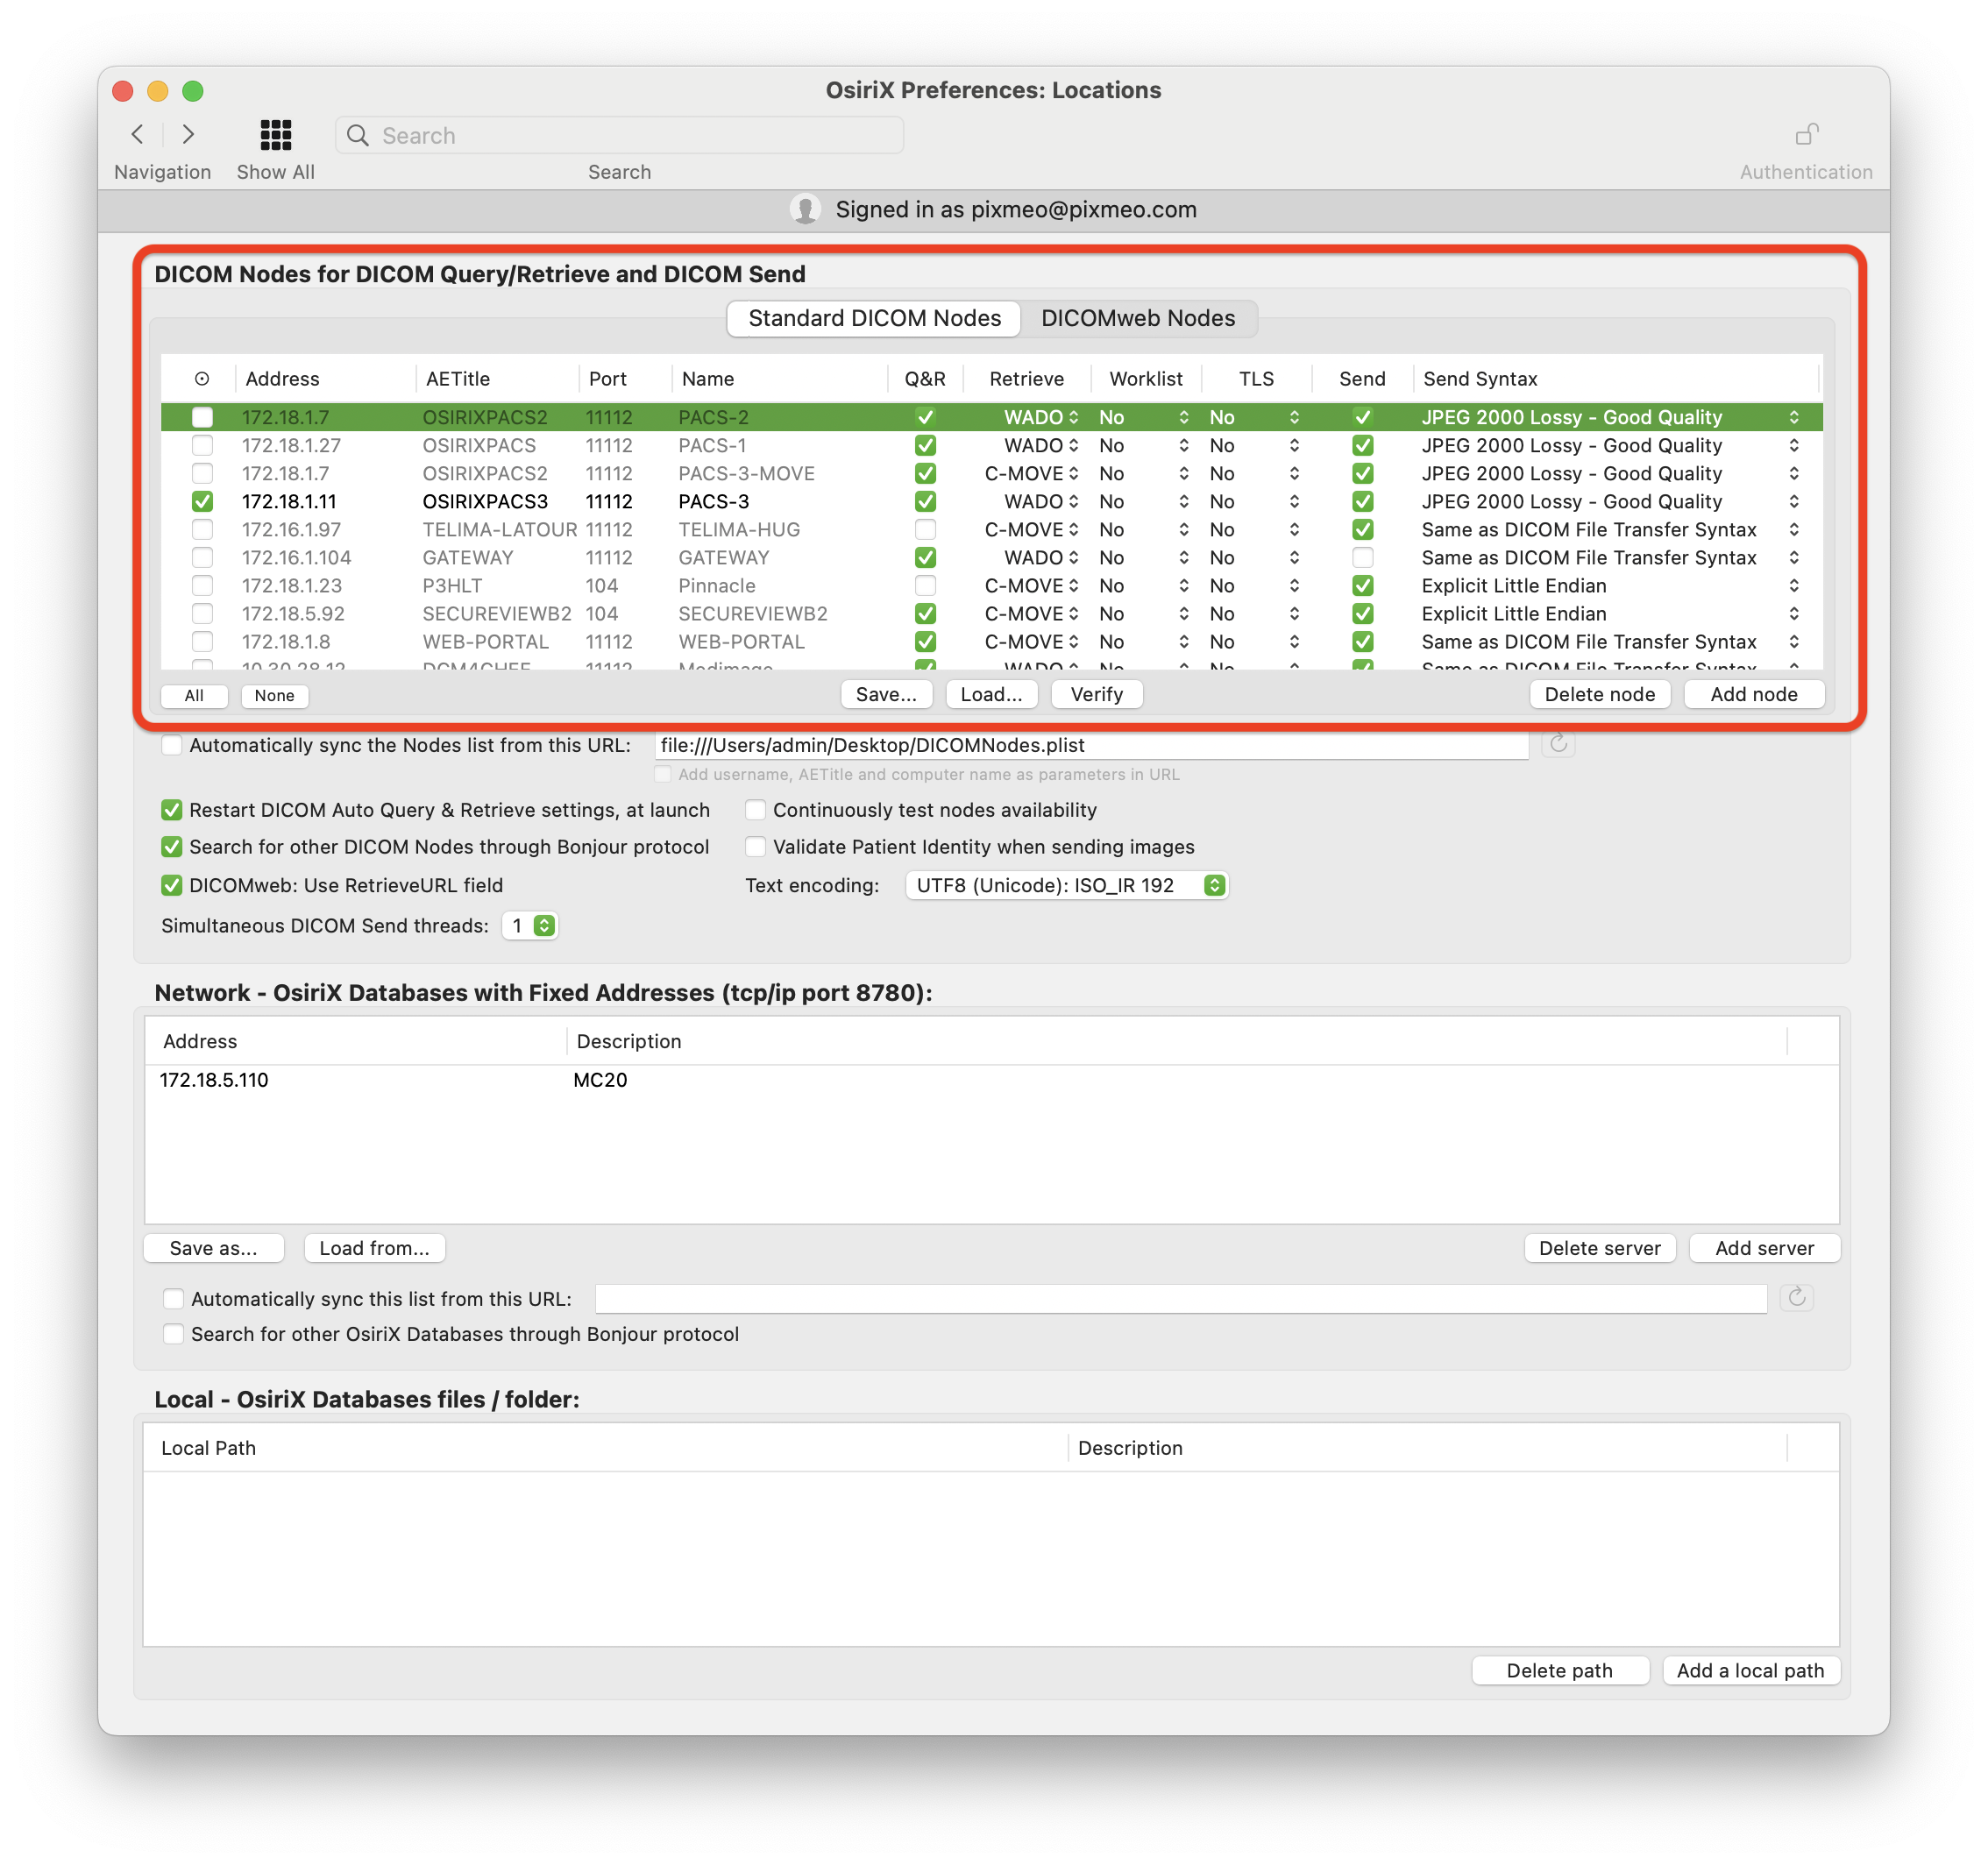
There are several protocols for a DICOM viewer to retrieve images from a PACS server (OsiriX is compatible with all these protocols):
- C-MOVE. This protocol REQUIRES to declare each DICOM viewer on the PACS server (see below). Most DICOM viewers are compatible with this protocol.
- C-GET. This protocol doesn’t require to declare the DICOM viewer on the PACS server. Only few DICOM viewers support this protocol.
- WADO and WADO-RS. This protocol doesn’t require to declare the DICOM viewer on the PACS server. This protocol is extremely fast when using OsiriX as a DICOM viewer or a PACS server. We highly recommend to use it, if possible.
If you want to use DICOM C-MOVE to retrieve the images, you will have to declare each client on your PACS Server in Preferences > Locations table. You can find the DICOM Node informations of your OsiriX workstation in the Preferences > Listener window.
Exchange images between OsiriX PACS server and OsiriX clients
If you want to retrieve specific studies from your PACS server, you can now open the Query & Retrieve window in OsiriX:
Select the source, enter a patient’s name and click Query.
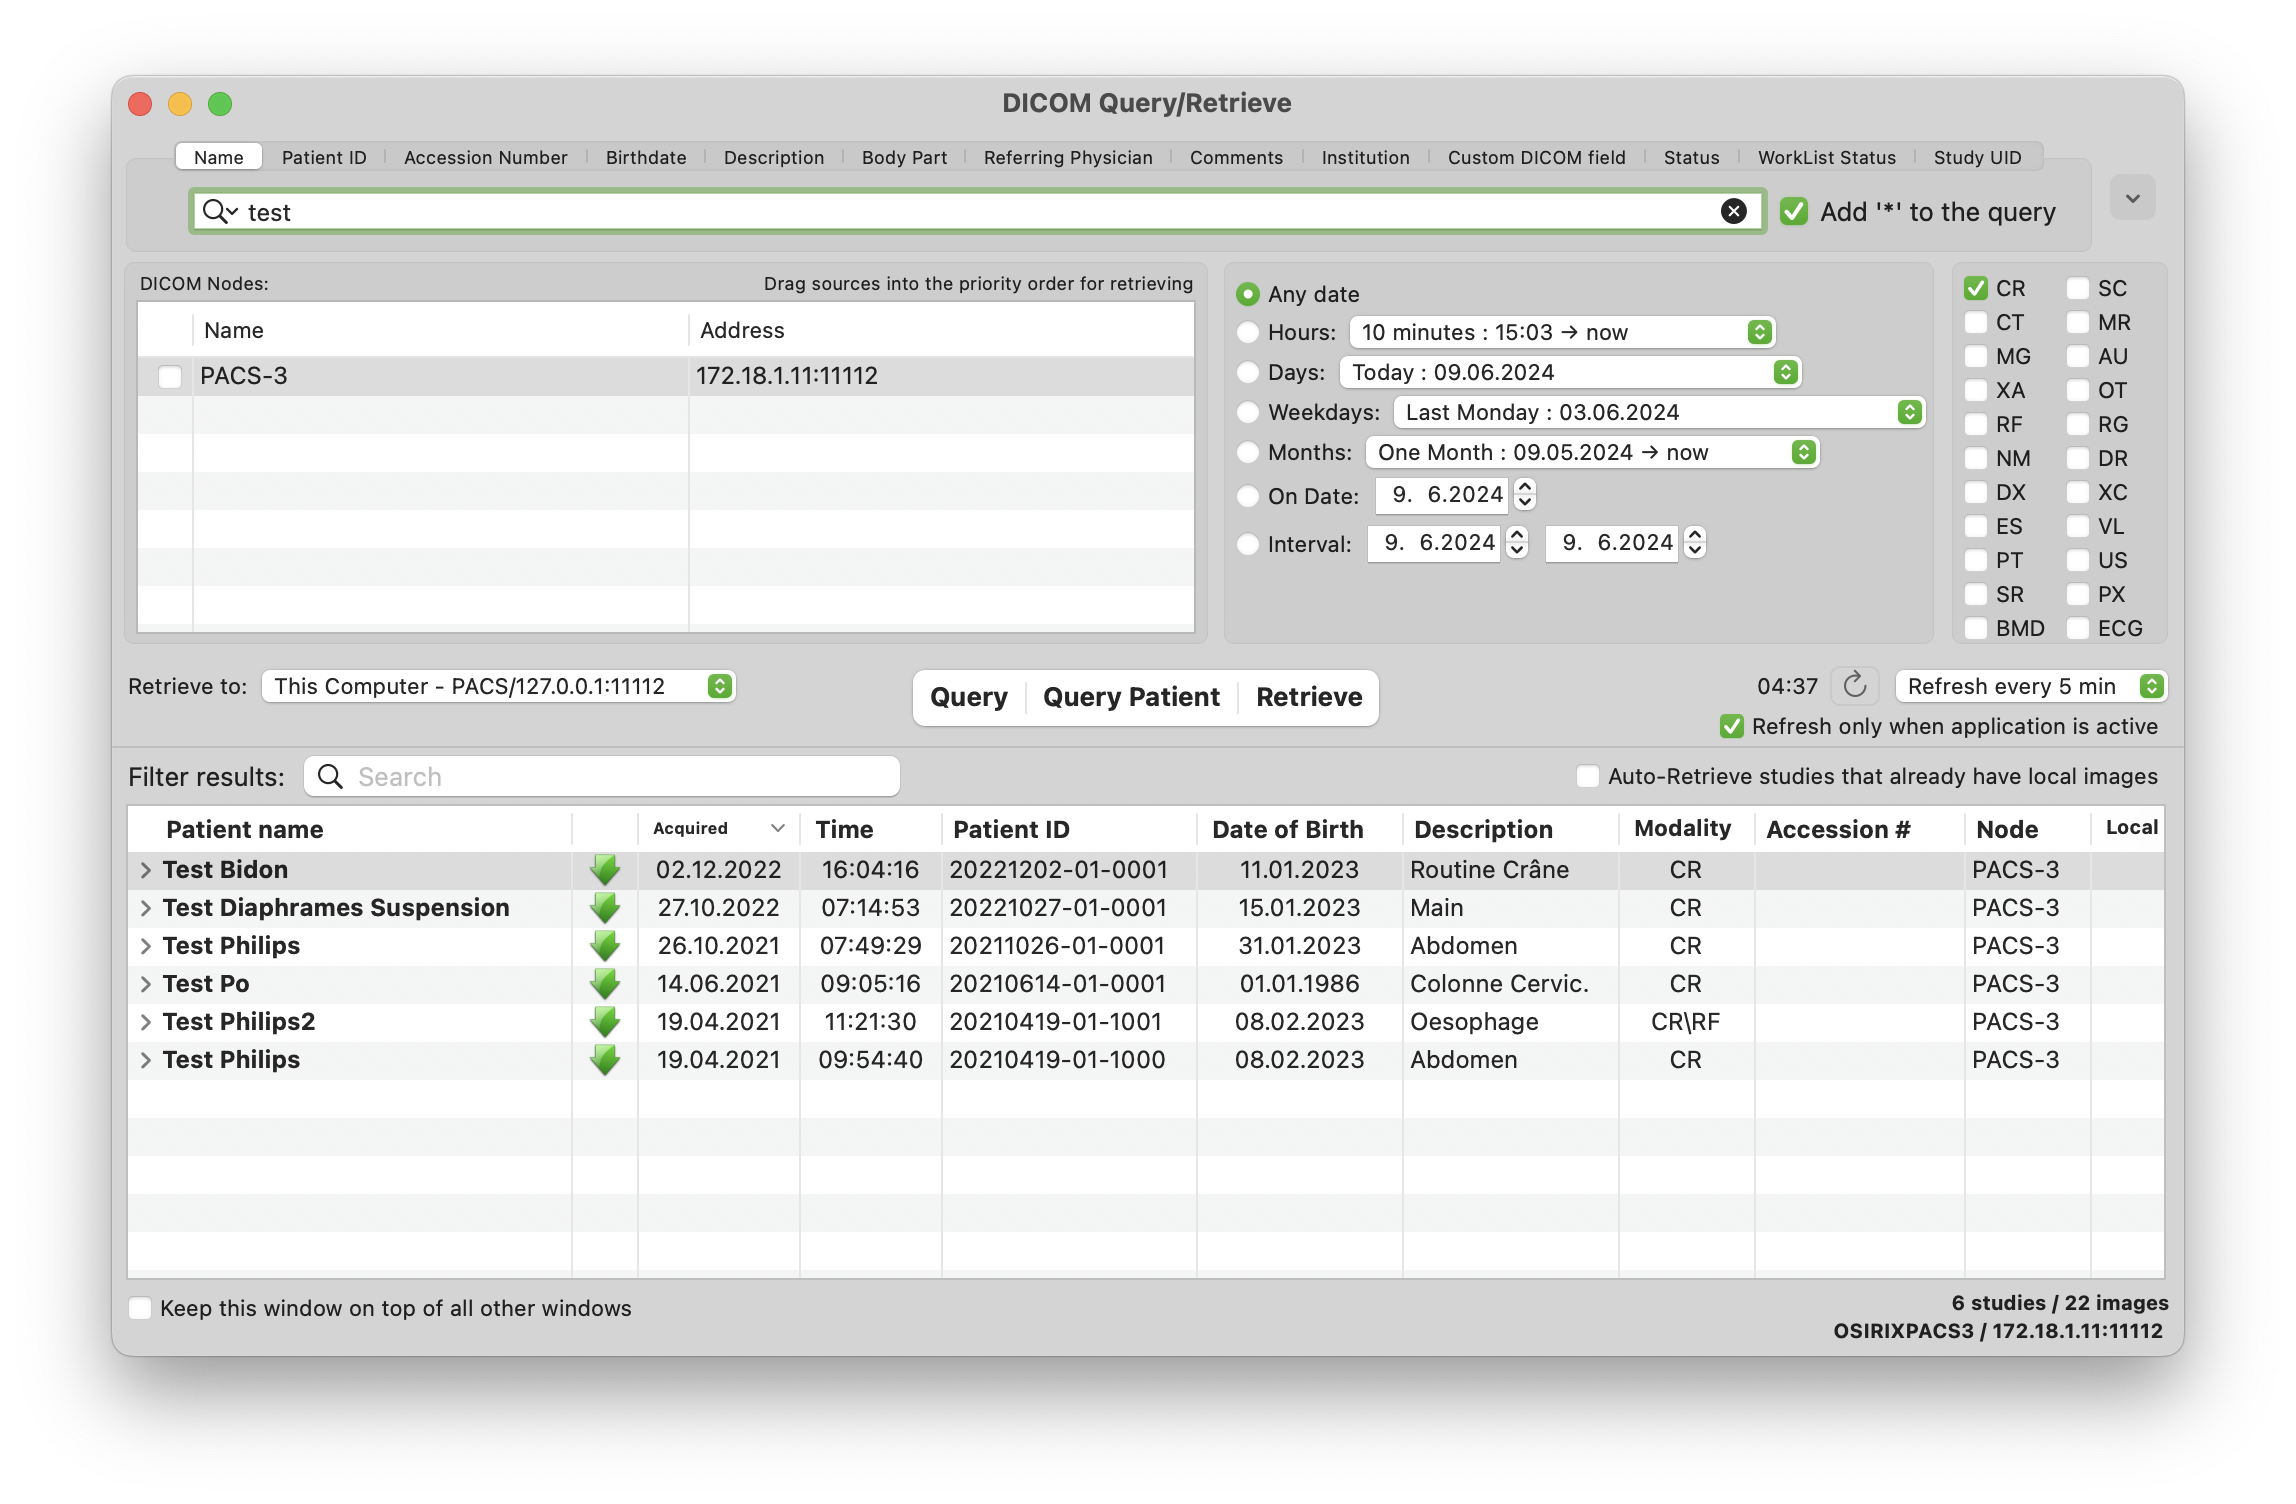
You can also send new studies from OsiriX to the PACS Server by using the DICOM Send function of OsiriX.
Conclusion
You just created and installed a complete PACS Network: PACS Server and PACS Workstations. To go further, you can now deploy the OsiriX built-in Web server or the PACS On-Demand features:
Problems? Support?
Are you looking for a 24/7 experts support to manage your PACS network and your OsiriX workstations?
Check our partners area.
