Case Report : Acetabulum fracture in a 65 years old man
Introduction
This case report demonstrates the preoperative decision making and planification, based on radiologic imaging in one patient presenting with an acetabulum fracture. Preoperative analysis of the tridimensional nature of osteoarticular lesions should ideally be performed by the surgeon himself. The unique multimodal versatility and availability of OsiriX MD makes it the ideal tool for orthopaedic surgeons who can use all its possibilities at their own desk.
History
This very active 65 years old man fell victim of a motorcycle accident and was admitted into hospital with debilitating hip pain. Admission plain films were judged unremarkable by the admission staff. CT, however, revealed a complex acetabulum fracture and the patient was taken in stationary care.
Preoperative image analysis and planning
Patient’s plain-films were downloaded online directly into OsiriX MD in the surgeon’s office from the radiology department PACS system. Patient’s pre-op CT was directly loaded into OsiriX MD from a CD.
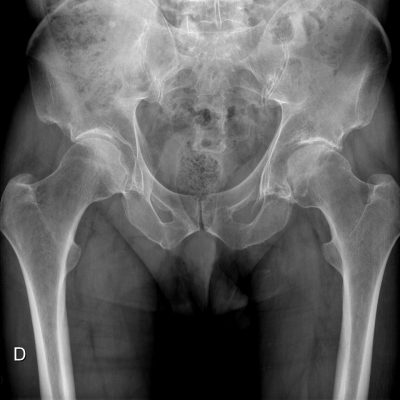
The admission plain films (Figure 1) reveals a probable left posterior acetabular fracture. The degree of displacement and comminution cannot be assessed on this view. Some degenerative osteoarthritis is present.
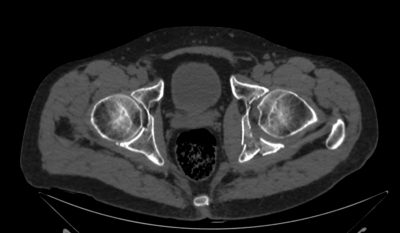
Multiplanar reconstructions such as these axial slices are essential for the understanding of the fractured acetabulum anatomy. Posterior wall acetabulum fracture as well as marginal impaction of the subchondral bone are clearly visible on axial slices provided by the CT (Figure 2). The analysis of the 3D anatomy of the fracture is primordial in the preoperative planning phase. This task must be done by the surgeon himself. Informations such as the the cranio-caudal dimension of the fractured segment as well as the 3D anatomy of the fracture however do require some extensile capacities of abstraction if they rely exclusively on 2D images.
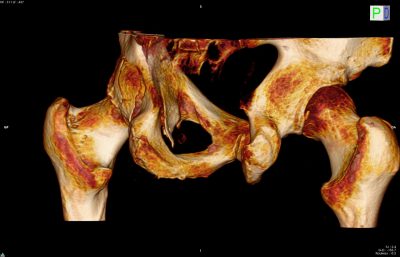
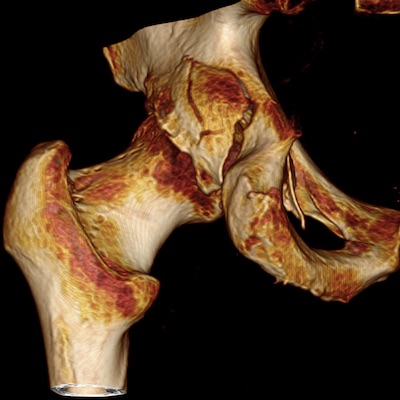
One of the most useful and powerful tools provided within OsiriX MD is the ability to build 3D reconstruction images based on the raw DICOM transverse cuts, available on PACS systems or CD/DVD. The 3D image depicted above (Figure 3) was executed in less than 3 seconds on a standard iMac using OsiriX MD “3D volume rendering” feature. The surgeon can rotate, zoom, cut, export the reconstructed image as he wants. 3D images can also be exported as a movie file. This is a very useful feature for illustration embedded in onscreen presentations or teaching. The same patient’s 3D image are seen below in a 360° rotation movie (Figure 4). The movie was produced in less than 10 seconds on the same iMac computer.
Figure 4. Preoperative 3D Volume Rendering, with 360° rotation
Due to this patient’s age, the pre-existing osteoarthritis, the degree of posterior wall impaction and comminution, as well as taking into consideration the long-term poor prognosis of open reduction and internal fixation after posterior wall fractures (more than 40% of osteoarthritis even after anatomic reduction in most large published series), we chose to perform an open reduction and primary joint replacement in this patient. The arthroplasty planification plugin developed by the OsiriX Foundation is available for free.
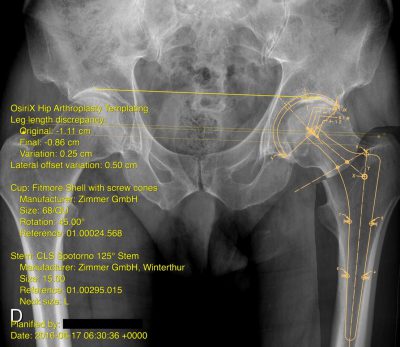
Preoperative planning for this surgery, as depicted below (Figure 5), was performed using OsiriX MD on the same iMac. Planification is done based on the AP pelvis, using the templates already provided by several companies such as DePuy, Zimmer, Biomet, Mathys, Medacta and others. The software plugin must be downloaded and installed in OsiriX MD. It will walk the surgeon through the successive steps of preoperative filmless planification. The magnification factor is first determined, then the horizontal axis of the pelvis is set, femur proximal or distal displacement (vertical offset) is then set by clicking on anatomic structures such as greater or lesser trochanter, the femur to be implanted is then grossly outlined. A cup template including size and orientation is then positioned over the acetabulum, followed by a femoral stem template. The last step is the reduction of the femoral head into the cup. Depending upon the choice of neck length (Short, Medium, L, XL), the software will calculate the vertical offset (Leg length…) as well as lateral offset. The image produced using this plugin can be copied as a JPEG file onto a USB key for example, and printed on paper or taken into the operating room.
Final result and outcome
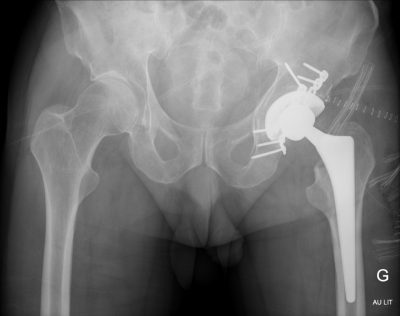
Figure 6 depicts the postoperative AP pelvis picture of this patient. We first performed a posterior approach to the hip. The head and neck were removed. Posterior wall was reduced and fixed using a reconstruction plate and screws. A press-fit acetabular component as well as a cement less stem were then implanted in the usual way.
At 3 months, this patient was full weight bearing, he returned to his former sports activities within 6 months and is symptom free at 18 months.
Dataset
Download and view the original dataset in DICOM format with OsiriX MD from here (Premium Membership required):
Modality: CT & CR
File Size: 71 MB
Description:
Acetabulum Fracture
